Sunday, March 23, 2008

Maple Syrup: Thrill of the Thaw


maple bottles2 copy March generally arrives in the nick of time: last year’s gallon of syrup is about gone, or may in fact have failed to make it to the next year’s production, forcing purchase at the store of a foreign (gasp!) product. Foreign state, usually—New Hampshire, Vermont (the largest producer in the country), Massachusetts, New York—but sometimes foreign country—Canada. If you knew how many my syrup’s-better-than-your-syrup joustings I’ve had with friends from other syrup-producing areas, you’d know just how fiercely loyal maple syrup fanciers are. In the realm of food, only corn and tomatoes spark similarly hot inter-state rivalry.
In the course of these arguments, I’ve been party to a number of side-by-side maple syrup comparisons. And I can say with confidence, if not particular helpfulness: they are all different. Weather, geography, local style preferences, and the economic incentives of and care taken by the farmer in the boiling process are all variables in a syrup’s sweetness, lightness, clarity, and overall quality. The syrup from the same farm will also vary from year to year.
Sugaring season lasts about six weeks, beginning usually in late February or early March, when the warmth of the sun on the trees causes the sap to run during the day, halting again at night as temperatures drop . The sap’s natural sweetness, ranging from about 1-4% (with a minimum of about 2% needed for syrup), is sucrose; the unique flavor comes from trace enzymes in the sap. Maple syrup is a completely pure, natural product; it is just boiled sap, with nothing added, until most of its water content has evaporated and its sugar concentrates to a density of nearly 70%. It is then strained, graded, and packed into glass, tin, or—increasingly—plastic (if you buy a large quantity or use your syrup slowly, I recommend freezing it and, if possible, transferring it into glass). These methods have barely changed since Native Americans first introduced this wonderful sweetener to the settlers. If you have your own sugar bush (group of sugar maple trees), you can even make your own. maple grades2
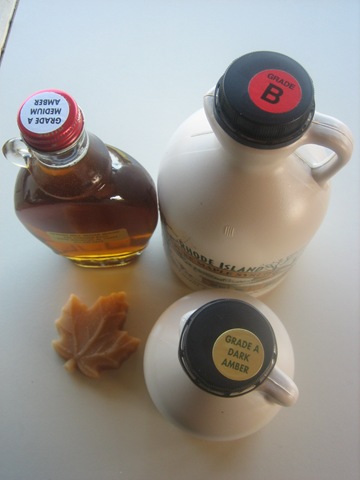
Maple syrup is a unique product requiring a good ten gallons of sap to make a single generous quart of syrup—the yield of about one tree for the entire season--and therefore commands a premium price according to grade. The grades have changed in recent years, and I still find it a bit confusing, to say nothing of silly. Ours used to be similar to Canada’s: AA (extra light or fancy), A (light) and B (medium), and so on. In the U.S., we now have three A grades: Grade A Light Amber (called Fancy in Vermont and some other areas), Grade A Medium Amber, Grade A Dark Amber, plus Grade B; the four go from light and delicate to progressively more maple-y, dark, and robust. But even here there is a mix and match; at Spring Hill Farm in Exeter, RI, where I bought my syrup this year, they also were selling “CD,” in between the dark Grades C and D, both part of the Canadian grading system. What to buy? Around here, most people use Grade B for cooking and medium or dark amber for the table. But the real criterion is to buy what your local farm has to sell; most will have B and at least dark and perhaps medium amber; this year, presumably because of weather conditions and perhaps partly because of costs, very little fancy or light grade is available. In addition to the syrup, of course, maple sap is boiled to different temperatures to make creamy maple candies, maple sugar, and maple butter or cream. Buy those too.
Sugar houses are generally open to the public to watch syrup being made; at some, you can still enjoy the traditional treats of sugar on snow (a sort of candy made by pouring hot syrup onto snow) and maple-glazed doughnuts with sour pickles. Pancake breakfasts are sometimes part of sugaring festivals or tours. A few farms still offer tours where you can ride out into the woods with the farmer on a sleigh or cart to collect the sap; I remember doing this about 20 years ago, and what a delight it was to return to the tiny, steamy sugar house with its wood-fired evaporator after driving slowly through the dark woods in the raw cold of a March afternoon. While many farms today collect sap via reverse osmosis and a pipeline, not being a Luddite (at least, not entirely) I recommend a visit to any farm that uses any method of collection; the boiling process remains virtually unchanged, and its miraculous product is well worth the trip—not the least reason of which is to support the producers.maple syrup2 copy
Use your fresh-made maple syrup in anything where you would use regular sugar, and particularly where you would use brown sugar or molasses: in baked beans, gingerbread and other spicy breads and cookies, as a sweetener for hot cereals or bread or rice pudding, in a glaze for doughnuts or coffeecakes. Of course, maple syrup is probably at its most sublime simply poured over your best sour milk pancakes or jonnycakes, where its light, fluid sweetness serves to set off their tangy edge. Indeed, wherever you have acidity, such as a salad dressing, maple goes well. That’s what first led me to use it when mixing up a batch of homemade whiskey sours. The syrup substitutes for simple syrup, minimizing effort at cocktail time . Which is, after all, one of the main points of cocktail time.
Maple Whiskey Sour
This favorite of my father’s is well worth reviving. You can experiment with substituting any number of sweet syrups for simple syrup made of sugar and water. For example, I also use my rose-hip syrup to make whiskey sours with wonderful results. Makes 2.
3 oz. blended whiskey (my father used Seagram’s V.O., and so do I)
3 oz. freshly squeezed lime juice, or half lemon, half lime
2 ½ oz. maple syrup, preferably dark amber
ice
lime slices (orange is traditional) and stem-on maraschino cherries for garnish
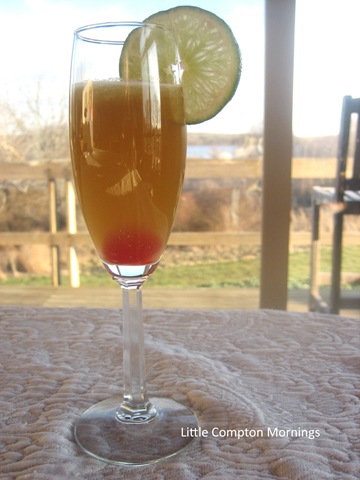
In a cocktail shaker, place 4 large ice cubes, the whiskey, juice, and syrup; shake vigorously, for about a minute. Strain into a sour glass or into a rocks glass over ice. Garnish. A proper whiskey sour should have a small frothy head to it.
                                                        maple sour2 copy

Saturday, March 15, 2008

Drawing Down Inventory: Frozen Blueberries

blueberry frozen2 copyI see from my calendar that it is March 15. As Caesar was so presciently warned, beware the ides of March! If you’re not careful, the first bumper crops of rhubarb* or asparagus will be here, and you will discover that you have not a square inch of freezer space in which to store them. Granted, this is not nearly so bad as being assassinated, but it can have its own fateful consequences. So, if you have not been doing so all winter—or if, like me, you have been but still have a good way to go on last summer’s fruits and vegetables before next summer’s comes in—it’s time to start drawing down inventory with a vengeance worthy of Brutus.
Start with the early-season items and work your way forward. My small amount of rhubarb is gone. I never froze any asparagus, so no pressure on that account. I have one jar of strawberry jam left, which I have moved from the freezer to the refrigerator for present consumption. Up next: the blueberries.
Frozen blueberries are an excellent substitute for fresh for most cooking and baking, from sauces and jams to cakes, pancakes, and muffins. The only thing I don’t like them for are pies and crisps; some people, not naming names, do use them for these purposes, but I think their water content is too high, both requiring too much added starch and sugar and having lost some of the requisite intensity of flavor.
For this reason I rarely make blueberry muffins with fresh blueberries: in season, they go into pies. But I love a good blueberry muffin, and have a few favorite recipes. One, which I will spare you, is an old-fashioned small, plain but rich muffin made with all lard; it is, truth be told, the one of which I am most fond. Another is a much larger, cakier, considerably sweeter muffin purported to be the original Jordan Marsh blueberry muffin recipe. One is always coming across recipes claiming to be the original this or that, but I think mine just might be authentic. I have had it since the 1970s, and acquired it while I was living in Boston—I think it was printed in the Boston Globe. Jordan Marsh was in its heyday at the time, and its flagship store, where the muffins were sold, was mere steps from my office. I ate them several times a week, and this recipe produces the real thing.
Jordan Marsh Blueberry Muffins
These muffins are loaded with berries, providing an excellent way to draw down your inventory. They are very good. The recipe is exactly as it was printed, except that I have added details to the instructions. Makes 12 large muffins, or 8 huge ones.
½ cup unsalted butter, softened
2 cups a-p flour
1 cup sugar
2 large brown eggs
½ cup milk
1 tea pure vanilla extract
2 tea baking powder
½ tea salt
2 ½ cups blueberries
2 tea sugar for sprinkling on topblueberry froz muffin cooked3 copy
Preheat the oven to 375 F. Grease a standard muffin tin, including the top surface. Use paper liners if you like; Jordan Marsh didn't, but they are easier to remove and freeze better if you do.
With an electric mixer, beat the butter and sugar on medium-high speed until light and fluffy; reduce to low and add the vanilla and the eggs, one at a time, beating until well blended; ramp up the speed again to medium-high and beat for another minute, or until you have a thick but still very fluffy batter. Sift the dry ingredients together and add them at low speed to the creamed mixture alternately with the milk, beginning and ending with the dry. Mash ½ cup blueberries with a fork (you will need to bring ½ cup of your frozen ones to room temperature or nuke them for about 20 seconds first) and stir them in with a wooden spoon, which will turn the batter a uniform taupe-y purple. Gently fold in the 2 cups whole frozen berries.
Spoon the batter into the tin, piling it high in each cup. Sprinkle the tops with the extra sugar; you can add a little cinnamon or cardamom if you like. Bake for 30 minutes or more, until golden, and allow to cool in the pan on a rack for an additional 30 minutes before turning out, as they are very tender.
blueberry froz muf4 copy
___
* Speaking of rhubarb, I have a short article on this amazing vegetable in the current issue of Edible Rhody magazine.

Saturday, March 8, 2008

Butterscotch Beans: Saturday Night Special

Butterscotch beans copyTo an outsider, New England has some odd gustatory habits. Sweet doughnuts served with sour pickles during sugaring-off season (hard upon us: coming up in a future post). “New York System” wieners that put minced hamburger meat on top of hot dogs—appropriately called “gaggers” here in Rhode Island, and not to be found anywhere in New York. Coffee milk, of course. And sweet baked beans as a main course, accompanied by rich, slightly sharp brown bread. Strange to you, perhaps; perfect sense to us.
The baked beans and brown bread are, in fact, a tradition for supper on Saturday in New England. It is, granted, an old-fashioned one, but one that has by no means disappeared, especially in the Northern states where, let’s face it, rib-sticking, intensely flavored food is what we crave on a blustery night (I live in “southerly” Rhode Island, but as soon as the temperature drops below 60, I start craving this kind of food). Baked beans are underrated, I think; they are one of those things, like good homemade potato salad, or rice pudding, that you just have to keep taking one more spoonful of. I’ll wager you haven’t made, perhaps not even served, baked beans in years (ever?). Try some; you’ll like them. You needn’t necessarily (although I recommend it, at least once) limit yourself to beans and brown bread: beans with baked, glazed ham and scalloped potatoes and green salad, a favorite menu of mine, will do. But do try them.
I use Butterscotch beans, a calypso bean also known as Steuben Yellow Eye, although you can use the more readily available Great Northern white beans. Butterscotch beans are a true heirloom, 17th-century bean generally believed to be the original—and still the best—bean for Boston Baked Beans. Like many dried beans, they are really pretty: you want to make something with them (I mean like a bracelet, not just something to eat). They nearly triple in size when cooked, having wonderful absorptive capacity, to borrow a term from the strategy field. Baked beans are infused with the flavors in which they are cooked. These are, in my house, maple, mustard (which supposedly aids their digestion, but just tastes good), and roasted salt pork. Sometimes I add some good chili powder for a little kick.
Rhode Island Baked Beans
This is based on the recipe of my old boss, Gary, but altered to substitute maple syrup for most of the molasses and with the addition of a huge hunk of roasted salt pork. You can, of course, skip the roasting step and simply cut up and add the salt pork. But you’d be sorry you did if you knew what you’d be missing. Historically, this dish would have included much more salt pork--the meat of the meal. Serves 12 or more; may be halved except for the pork, which can be cut by ¼.
2 lb butterscotch beans
1 lb salt pork, with as much lean as possible
1 large onion, finely chopped
½ cup dark molasses
1 cup maple syrup
3 fat cloves garlic, finely chopped (Gary said, “infinitesimally”)
6 T dry mustard
Put beans in a large bowl, add water to cover by at least 2 inches, and let soak overnight. The next morning, put the beans and water in a Dutch oven, adding more water if necessary so that they are completely covered; bring to a boil; and then reduce to a simmer and cook, skimming the major foam, for up to an hour—likely less. To test, lift out a spoonful of beans and blow on them gently: they are done if the skins split. Drain, reserving the liquid.
While the beans are simmering, preheat the oven to 400 degrees and cut the pork in half horizontally. Score the rind of the top half (you may need to make Roasted pork 2 copyindividual cuts in it with a sharp knife, as the skin is tough) and place it in the oven in a shallow baking dish; roast for 45 minutes, or until golden brown and the skin blisters. When done, lower the oven to 300 F. Chop the remaining half of the salt pork into ¼” cubes.
In a bean pot or other deep heavy dish (my ancient bean pot fractured from fatigue years ago, and I have since used a hefty soufflé dish), place the roasted salt pork. Pour the beans over/around the pork, leaving some of it exposed, and then distribute the chopped pork among them.
In a small bowl, mix the molasses, maple syrup, mustard, garlic, onion, and 2 cups of the reserved bean liquid. Pour over the beans, and combine gently so as not to bruise or break them; your hands are best for this. The liquid should be just at the level of the beans—not above, or they will stew; if not, add a bit more of the reserved bean stock. Put the lid on the pot (or cover with foil) and bake for five hours, checking the level of liquid hourly and adding a bit more to keep them just covered and to prevent them from drying out. Remove the lid and cook one hour more. The beans should be glazed and dark caramel in color. Serve with Boston brown bread and butter for supper, digging under the pork rind to pull out some long meaty shreds of pork for each serving.
If you are a true New Englander, you will make a bean sandwich with the leftovers next day, mashing them between two slices of sturdy homemade white bread spread with a little mayonnaise and mustard. A little sliced, grilled Portuguese-style chorizo would not be amiss.
Baked beans1 copy Beans and bread3 copy

Saturday, February 23, 2008

Comiendo in San Miguel: ¡Qué Rica!

Really, I couldn't not go. Delta was having a special promotional fare from Boston to Querétaro for $350 round-trip inclusive of fees and taxes, and I had a lovely little casita in which to stay, attached to my sister's house, for free. Another one of my sisters was going to be there, too. So really, I had to go. It had nothing to do with the fact that Mexican is both my favorite and, in my estimation, the greatest of the world's three or arguably four great, fully distinct cuisines (the others being French, Chinese, and--the arguable--Italian). Really, nothing at all.

But of course I ate. And ate. My sister had arranged a round of dinners and cocktails (tequila the drink of choice) at friends' houses, and we also had breakfasts (there's nothing so satisfying as chilaquiles in the morning) and lunches out. San Miguel de Allende is a Colonial city with cobbled streets and uneven sidewalks (where they exist), forcing one to stop frequently for a restorative bebida and a quick taco, sope, or pastel. Everywhere, the little doorway stands (an open door, a vestibule-sized space with a cook, a comal, and a single table for patrons) selling a single specialty item--gorditas, menudo, carnitas, tamales, chicharrones--beckon. At the vast Tuesday market, acres of stands run by families and individuals compete for the trade of demanding and equally hardworking locals. To avoid la turista, one must choose carefully, perhaps avoid. But they offer a visual feast even if caution wins out.

Among the many eating occasions was a sisters viewing party my sister-in-residence threw for us visitors, to which were invited some 60 of her closest friends (I marvel at this: I have about 3). She's an artist, as are many of the ex-patriots living in San Miguel de Allende, and thinks in terms of shows. Fortunately, she did not hang us; we were more like performance art, I guess. It was great fun, and I in particular enjoyed planning the menu and helping a bit to prepare the food with the incomparable Maria, my sister's housekeeper. Maria has ten (10) children--not a typo. She caters; she helps her daughter in her restaurant; she cleans; she shops and manages; she is muy amable. And she is increíble.

The food was a simple spread of antojitos, made from the finest ingredients--queso fundido with chorizo made in her son's carnicería; flautas de pollo (we had a serious and lengthy discussion about the proportions of oil and lard in which to fry them) with salsa verde and all the trimmings; little albóndigas (meatballs) in chipotle sauce; and jícama with chile, lime, and pickled ginger. There were also chicken tamales, a gift from a neighbor's housekeeper in honor of the visitors. Maria and her daughter handled everything--after catering for a dance and a film crew from 8 p.m. until 3 a.m. the previous night. Did I mention she is amazing?

The next morning I sat at my sister's flower-covered table eating a leftover chicken tamale with green sauce for breakfast. It was yet another brilliant, 80-degree day. I had absolutely nothing that I had to do. Qué rica, indeed.

Salsa Verde
This is a quick, versatile, tangy sauce of the “cooked” category of Mexican salsas. It is fabulous with scrambled eggs, tamales, and chicken tostadas, and is the ideal accompaniment to a true quesadilla made with fresh masa. If you cannot find fresh tomatillos, generally available in large markets, the canned tomatillos available online, if not in your neighborhood, are a very good product; they are already cooked, so you can skip that step. Makes about 2 cups.
1 ¼ lb fresh tomatillos
1 medium-large clove garlic, peeled
½ tea salt
¼ cup chopped fresh cilantro
1 chile Serrano, chopped, seeds removed or not
Choose firm, medium-large fruit that are beginning to pop through their papery husks; their skins should be smooth and bright yellowy-green. Remove the husks from the tomatillos and wash them to remove the normal gumminess from their skin. Boil until their skins burst, and they are very soft and just begining to lose their shape, 10-15 minutes. Remove with a slotted spoon to a food processor, reserving the water. Add the garlic, cilantro, chile, and salt to the food processor and process until smooth. The sauce should be slightly fluid; add a few tablespoons of the reserved hot cooking water if needed and taste for salt. Serve at room temperature.
Salsa verde keeps well in the refrigerator for up to a week, and can be frozen. After refrigeration it will be somewhat jelled; thin it again with a little hot water if needed.


Saturday, February 16, 2008

Graham Flour: Where Goodness Meets Godliness

Graham flour copy One of the after-school snacks my grandmother used to give me, when it wasn’t the divine sugar bread, was graham crackers spread thickly with soft butter. My grandmother wasn’t a religious woman—she had her own supreme power—but turns out that graham crackers were meant to be divine in their own way. They were the invention of the Reverend Sylvester Graham, a deeply repressed 19th century Presbyterian preacher in my home state of New Jersey, who developed the flour from which they were made in a crusade to fight sin and promote temperance through sound bodily health. The underlying theory was, sort of the like the theory that sugar creates hyper kids, that white flour leads to drunkenness and fornication. Whole grain breads (and vegetarianism) would be the road to clean-living salvation.
Whole grains haven’t made a saint out of me, or anyone else in the more than 175 years since Graham introduced his graham flour and “graham bread,” but he did have a point about general health. We have the last laugh, though, because some things made with graham flour can be, well, sinfully delicious.
Graham flour is essentially a super version of whole wheat flour: the true article is coarser than regular whole wheat and contains more of the bran and germ, which are ground separately from the endosperm (the basic fine flour component) and added back into the flour after it is ground. It has a naturally sweet and nutty taste that comes through in baked goods ranging from the traditional graham cracker to pie crusts. Graham flour is also used for graham nuts cereal (similar to the commercial brand Grape Nuts®), which you can easily make at home. I most often use it for rich but nutritional quick breads, such as muffins, date-nut, and Boston brown bread, the favorite accompaniment to baked beans for a New England Saturday night supper. If you make some now, freeze a loaf for next week or the week after, when I’ll provide a recipe for those beans.

My Boston Brown Bread
Brown bread is a rich, moist steamed bread, traditionally made in a can and sliced into rounds. It is excellent spread with butter or cream cheese, and also makes nice ham or ham and cream cheese sandwiches. Makes 2 loaves.
½ cup raisins—dark is traditional
2 T whiskey or brandy
1/3 cup boiling waterBrownbread batter 1 copy
¾ cup graham flour 
½ cup RI jonnycake cornmeal
½ cup rye flour
¼ cup a-p flour
½ tea salt
¾ tea baking soda
1 large brown egg
½ cup dark molasses (sometimes labeled “full flavor”)
1 ½ cups sour milk or buttermilk
½ cup walnuts, broken into pieces (optional)
Liberally coat the interiors of two 20-oz cans (a standard size for canned fruits and vegetables) or mini bread pans with oil or cooking spray. See the post on plum puddings for instructions and photos related to covering and steaming the containers.
In a small bowl, pour the brandy and boiling water over the raisins and set aside while you make the batter.
Combine the dry ingredients in a medium bowl. In a 2-cup measure, beat the molasses, milk, and egg until well blended. Make a well in the dry ingredients, pour in the liquid, and stir until just combined; the batter will be fluid and a little foamy. Drain the raisins, discarding the liquid, and gently fold them into the batter together with the walnuts.
Using a preserving funnel if you have one, spoon the batter into the prepared cans, leaving an inch or two of space. Cover tightly with foil secured with rubber bands. Place in a Dutch oven on a rack and pour boiling water about half-way up the sides. Cover the pan with a lid and steam, either on top of the stove or in the oven, for 2 hours. Remove the foil and test with a clean skewer by inserting it the full depth of the bread; it should come out completely dry and the exposed top should be springy. If not, steam an additional 20-30 minutes. You are seeking a fully cooked but still very moist crumb, so timing may take a bit of experimentation to avoid either a too wet or too dry product. Let cool in the cans for about 10 minutes, then remove the bottoms of the cans with a can opener; the bread will push out easily. If using mini bread pans, loosen around the edges with a knife and turn out. Serve warm; a thin slicing rather than a serrated knife works best. To store, cool on a rack and wrap tightly; reheat gently in a microwave or serve at room temperature.

Brownbread 1 copy                brownbread butter2 copy
______
P.S. I’m off to Mexico for a week; I’ll try to post a food note from there, but if not will return to regular posting March 1.

Saturday, February 9, 2008

Pears: The Shape of Good Things to Come

Pears 1 copyPears are one of the few reliable fruits for winter eating and baking. Only citrus competes for availability and quality during the winter months, and depending on the weather in Florida and California, often loses the contest.
On the American market, four varieties of pear are readily available: Bartlett, Anjou, Bosc, and Comice; you may also see the smaller Forell or Seckel, which is popular for pickling. As a generalization, Bartletts are a good all-purpose pear; Comice are luscious, fresh dessert pears; Anjou are buttery, juicy pears excellent for eating, poaching, and cooked desserts; and Bosc pears are good for baking or grilling as they are drier and tend to hold their shape better. All are flavorful and aromatic in their own ways, so the crucial difference is texture and juiciness. In particular, if you use Anjous for pies, be sure to use enough starch to compensate for their juiciness.
When buying, think about when you want to eat them. Pears are best ripened off the tree to avoid the grittiness that is a property of pears, so they are generally sold hard so that they may be ripened at home and used at peak perfection. Leave them, covered, at room temperature, periodically checking for ripeness by pressing gently around the neck, or stem end—the color they are when you buy them is pretty much the color they will stay. When they yield or soften under this pressure—usually 2-3 days— they are ready and should be used right away. You can put them in the refrigerator after they are ripe to keep them a few days longer if you must. Nutritionally, pears are a good source of dietary fiber, especially if you leave on the thin, edible skin, and of potassium and vitamin C.
Pears and apples are kissing cousins, coming from the same subfamily. As with apples, there are thousands of cultivars, and you can use their fruit in similar ways, although it is surprising how rarely pears are used in pies, or apples for poaching. But you can do either with either. Pears make great crisps, butters, chutneys, and sauces, and, like the wonderful baked apple, pears too can be roasted. They are a perfect match for cheese, especially blue and other salty, strong cheeses. Pears, caramelized walnuts, and blue cheese are popular as a topping for pizzas or crostini or as a salad with bitter or peppery greens; the affinity for salt means pears also are a good winter fruit to match with prosciutto, ham, or even some nice salty Chinese food. Like most of us, pears also love chocolate and eggy custards. As a garnish for a chocolate cake, baked in a tart in a pastry cream filling or served poached with crème anglaise and a thin chocolate sauce, they make a lovely dessert. Here is one to try.
Roasted Pears with Maple Glaze  Pears for oven 1 copy
These pears are really cooked by a combination of braising and baking, based on the cooking method given by Kate Zuckerman in her cookbook, The Sweet Life. Although these take no skill at all, they do take time and attention—but they are delicious and impressive. Choose blemish-free pears with their stems intact. My usual maple-cardamom fixation suits the pears well. Serves 8.
8 Anjou or other pears, stems on, of roughly uniform size
½ cup 100% maple syrup
¼ cup raspberry or other fruity, dark honey
¾ cup sugar
¼ tea ground cardamom
4 or 5 strips orange peel
2 T unsalted butter
2 ½ cups water
Optional accompaniments: chocolate sauce or vanilla custard sauce, orange tuiles or other simple, crisp cookie
Preheat the oven to 425 F. Put the water into a large shallow roasting pan such a lasagna pan.
Hold the pears upside down and peel them from the bottom, blossom end to the stem with a vegetable peeler; turn them around and remove any remaining peel in a downward motion from around the stem. Cut a small slice off the bottoms so that they can stand upright later. As you peel them, put them in the pan of water on their sides and turn them around to wet them.
Pears roasted 1 copyStand the pears up in the pan and add the remaining ingredients, sprinkling the sugar over the pears; no need to mix. Put them in the oven for 30 minutes. Remove the pan and, with a soft rubber spatula to prevent injury to the pears, push them on their sides. Return to the oven for 20 minutes; remove and turn the pears, and return them to the oven for another 20 minutes. Test for doneness by piercing the bottom of a pear; if they are not yet tender, return them to the oven for another 20 minutes. This is likely.
Remove the pan from the oven and stand the pears upright, using the rubber spatula and the stems to assist. Spoon some of the liquid, now forming a syrup, over the pears and return them to the oven. Roast, basting every 15 minutes, for another 45 minutes to an hour or until the pears are glossy and caramelized. The syrup will continue to thicken and bubble, and the stem ends will become very dark, almost black. When they are done, baste them once more and transfer them to a plate to cool, reserving the caramel sauce in the pan. When they are cool enough to handle, remove the core from the bottom with a small melon baller or knife.
These are best served slightly warm (reheat them gently in the oven; if the caramel has stiffened too much, reheat that as well). Sit them on a shallow plate in a little pool of the reserved caramel, garnish with a cookie, and drizzle with a little of your best chocolate sauce.

Pears syrup 1 copy                 Pears choc 6 copy

Sunday, February 3, 2008

Notes From A Swiss Canton

cheese at Bern marketYou probably didn't know that you could go to Switzerland to escape New England's frigid temperatures, but I discovered over the past weeks that you can. Sun, and temperatures in the 40s and 50s, reigned, and there was not a drop of snow on the ground--only, in picture-postcard fashion, on the distant Alps seen comfortably from city bridges. There were days when it was too warm to wear a coat.
The capital city of Bern's outdoor markets can thus proceed biweekly year-round. The quality of the offerings at this time of year is remarkable. Special to the locale is the huge selection of cheeses and cured and smoked meats and sausages that never find their way out of the country. I was particularly fond of the dried venison, first sampled on the flight over and a favorite while I was there. The produce, however, was the big surprise. Considering it was late January, the quality and variety (such as some 7 or 8 kinds and colors of carrots) were Lettuce at Bern marketimpressive, and it appeared that much of the product was local. For such a small country, Switzerland is substantially self-sufficient in food production, thanks to a strong, although declining, system of protections for farmers.
Regrettably, I did not have access to a kitchen while I was there, but I was able to sample the excellent local cheese, meats, bread, wine, and chocolate. Swiss restaurants reflect the country's multilingual, mixed culture: French, Italian (the best food in the country, perhaps), and traditional Swiss, the latter serving simple, good food based on cheese, potatoes, and meats. Homey dishes like rosti, fondue, and raclette are easily replicated in American kitchens and are suited to the winter months. I particularly like raclette, an ostensibly dull combination of melted cheese, boiled potatoes, and pickles that makes for a satisfying assemblage of flavors.
Raclettecararaots at Bern market
Traditionally raclette is made by holding the cheese close to an open fire and scraping it onto a plate as it melts. A romantic image, but nowadays it's generally made on top of the stove or under the broiler. Raclette makes for a rather colorless plate (I use red-skinned potatoes for that reason), but resist the temptation to fancy it up. It's plain food that tastes good.
For each person:
1 slice raclette or other flavorful, semi-firm cheese such as Italian Fontina or Emmental, about 3/8" thick (5 oz/person)
3-4 fingerling or 2-3 other small all-purpose potatoes, boiled
4-5 cornichons or small gherkins
Cheese at dept store2
5-6 small pickled onions
freshly ground pepper

Place the cheese in the center of an oven-proof dish and season with a few twists of the pepper mill. Place the dish under a preheated hot broiler until the cheese melts and begins to brown but not burn. Surround by the pickles, onions, and hot potatoes, and serve immediately with dry white wine. Chocolate for dessert adds a touch of luxury to this otherwise homely meal.
Cheese cut 3 copy Ch Raclette 3 copy Chocolates copy