Saturday, April 24, 2010

Pastured Pork: Simple Supper, Sublime


Pork Chops It is rare that the memories of childhood are more than that. For the most part, what we grew up with is gone, unheard of in today’s bigger-is-better world. It’s called “progress.” Think once-pristine coasts now lined with cheap condos; the dull malling of once iconic and individualistic thoroughfares like Fifth Avenue and its smaller-city counterparts; the replacement of small, highly organized specialty shops offering endless choice (100 white blouses, anyone?) with department stores with imposed brand preferences and insultingly manipulative layouts. And of course, that tragic emblem of all progress: the commercially available, red-but-not-ripe tomato. Add the juicy, deeply flavorful pork of my youth to that, and you have a lost dinnertime world that truly is a taste memory.

For a long time, it was possible to keep the tomato memory alive by only eating tomatoes in the summer, when you could grow them yourself or buy them down the road from your local farmer—and even that has become touch and go, given the seed business, unless you raise or find heirloom varieties. But the pork of my youth was pretty much gone, and for me, this was truly distressing. My favorite meal in the world growing up—the one my mother or grandmother made for me when I came home from college—was stuffed pork chops with homemade applesauce. My grandmother would cut a pocket into the fat-side of a 2”-thick pork chop; fill it to overflowing with a simple stuffing of seasoned bread, onion, and celery; and bake it until the fat melted into the bread and the stuffing oozed out, rich and moist.

I gave up making this many years ago. It just didn’t work anymore. I confined my pork-eating, other than bacon or sausage, to pork tenderloins, which I would braise or grill for flavor—i.e., I gave up on the idea of having flavorful pork without intervention. But that didn’t mean I didn’t still think about it.

Then, of course, came Niman Ranch in the 1980s. OK, “natural” and carefully raised, the best available for a while, good for eating out, and for the occasional mail-order splurge. But not, you know, like home. Then suddenly, or maybe not so suddenly—revolutions take time—heritage breeds of pig, raised completely on organic pasture, vegetables, and necessary amounts of organic grain, started showing up at farmers’ markets. The heart races: it looks like the pork of your youth. It has fat—in it. Like a good steak. It’s not pale. It’s not trimmed to within 1/16 inch of its life. OMG, it’s pork!

Two of the most readily available heirlooms are Tamworth and Berkshire, both old English breeds. Thanks to the American Berkshire Association, set up in 1875 when the Berkshire was first introduced to America, the Berkshire, a black pig with little white feet, sort of a big version of my sister’s cats, is much as it was 100 years ago. It is pork with a pedigree. And it is delicious. So ask your farmer not only how he raises his pigs, but what kind of pigs he has—including whether they are certified Berkshires. They are worth seeking out.

Here are some Berkshire pork chops simply grilled with salt and pepper for a work-night supper, accompanied by equally simple grilled potatoes and a little rhubarb puree. Not the favorite supper of my childhood, but a remarkably tasty cousin for another welcome return, the hot and sunny spring day. Memory incarnate.

Pork chops on grill      OLYMPUS DIGITAL CAMERA

Sunday, April 18, 2010

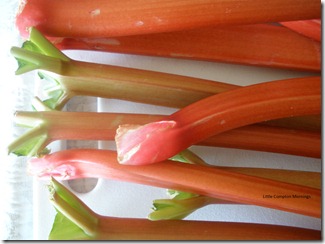
Rhubarb, Maple Syrup, Eggs: Spring At Last


Rhubarb OLYMPUS DIGITAL CAMERA


No one who lives in Rhode Island needs to be told that winter, and early spring, was record-breaking cruel and unusual this year. And while it’s not exactly summer yet, there’s reason to hope that, with May around the corner, there really cannot be another devastating storm—at least not until hurricane season. Four whole months away! Let’s eat!

The edible signs of spring are late, but they are there. The maple syrup is in, there is nice rhubarb at the market, and the hens are laying eggs. Either one alone is cause for celebration. Rhubarb has become one of my late-in-life pleasures; pretty as it is (and I am a sucker for eye-appeal), I would not touch it despite being surrounded by rhubarb fanciers in my youth. I love it, as did my grandmother, stewed with sugar and eaten plain from a bowl, or stirred into yogurt. Maple syrup, in contrast, is a life-long friend; in the “don’t leave home without it” view of an essential item, I have small bottles of it in my glove compartment, my purse….have syrup, will travel. In Rhode Island it goes over countless johnnycakes, naturally, but also into countless sweet and savory dishes and my maple syrup whiskey sours. And eggs, a perfect food in its own right, are a sign of resurrection from the dead of winter like no other.

Choosing one over the other is too hard, and I’m one of those people who believe that playing favorites is unjust, so: equal time for all. Fairness is very satisfying, as this little tart attests. Of course, fair does not necessarily mean low-cal, low-fat, or low-carb, or low anything. In other words, fairness in baking is a universal good: it’s a delicious treat, one you deserve after the most brutal winter and early spring in 200 years. Restitution on a fork.

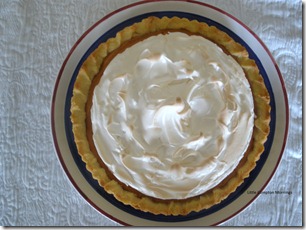
Rhode Island Maple-Rhubarb Tart

You can make this over a few days if you wish, making the dough and/or the purée the day before. The tart shell must be pre-baked blind. Makes one 9” tart; serves 6-8.

Rhubarb PuréeOLYMPUS DIGITAL CAMERA

3 generous cups fresh rhubarb (about 1 lb of medium-size stalks, washed and trimmed)
¼ cup fresh-squeezed lemon juice
¾ cup sugar
¼ tea cardamom
1/3 cup Grade B maple syrup

Cook the first 4 ingredients for 5 minutes; add the maple syrup and cook about 5 minutes more, taking care not to scorch, until thick and coherent. Put it through a strainer. You will have a scant cup of purée. You can refrigerate it for making the curd later, or proceed.

Rhubarb Curd

1 cup rhubarb purée
Zest of 1 lemon
3 large egg yolks (reserve whites)
1 large whole egg
1 T maple syrup
2 drops red food coloring (optional)
12 T unsalted butter
2 T heavy cream

In a chef’s or other heavy pan with sloping sides, stir together the purée, lemon zest, egg and egg yolks, and maple syrup; I like to use a wooden spoon but you may prefer a whisk. Over low heat, stir/whisk the mixture continuously until thick and it just begins to bubble. Be careful not to curdle it; you may wish to do this over simmering water in a double-boiler. Check the color; if you don’t like it, you can add a drop or two of red food coloring; stir completely to incorporate.

Remove from the heat and beat the butter in, tablespoon by tablespoon, stirring until it disappears; put it back over low heat from time to time if needed. Stir in the heavy cream.

Pâte Sucrée

4 oz (1/4 lb, or 1 stick) unsalted butter, partially softened
¼ cup sugar
1 large egg yolk
1 ½ cups a-p flour
¼ tea salt
1 T heavy cream

Place the softish but still cool butter in a standing mixer and beat a minute or two till soft; scrape down the bowl and add the sugar, beat a minute, and then add the yolk and beat until incorporated. Add the flour and salt, beat until it comes together (it will still be a bit crumbly), then add the cream and beat a few seconds until smooth. Wrap in plastic and chill for several hours or overnight (dough can also be frozen).

Remove the dough and soften enough to roll by cutting it into several pieces and kneading them with your hand, then forming them back together into a disk. Tap the disk with your rolling pin, then roll it out quickly on a floured surface; once soft, it gets really soft. Lift the dough carefully into your tart pan, trimming the overhang to about ½”, and turn this overhand to the inside against the edge. Chill again for 15 minutes or so. Preheat the oven to 375 F while it chills.

Remove the pan and flute the edge or press it with a fork. Prick the bottom with fork, and line the pan with foil and some weight (beans, rice, etc.) or a smaller-size pan. Bake 10-12 minutes; remove the foil/weight or pan, and bake another 5 minutes or so, until golden. Cool on a rack.

Finishing the Tart

Preheat the oven to 350 F. Pour/spread the rhubarb curd into the baked pastry shell. Bake the tart for about 12-15 minutes, until firm. You could now serve this with maple whipped cream made with good heavy cream, or finish it with:

Maple Meringue

3 egg whites, reserved from making curd
¼ tea cream of tartar
2 T Grade B maple syrup
1/2 cup sugar

Beat the whites at medium speed with the cream of tartar and the syrup until thick and foamy. Raise the speed to high and beat, gradually adding the sugar, until the mixture forms marshmallow-fluffy, shiny peaks.

If you do not have a kitchen torch, heat the broiler. Lightly oil the inside and rim of a flan ring the size of the tart pan or an inch smaller, and place it, oiled rim down, on the tart. Spoon the meringue into the ring, spreading it neatly and evenly out to the edges with a rubber spatula. Dip the spatula into the center and around the circumference to pull soft peaks out of the meringue. (If you don’t have a flan ring, just pile the meringue on.) Place the tart under the broiler until lightly brown (or use your torch). Put the tart in the freezer for 30 minutes (or up to 4 hours) before serving). Cut firmly and cleanly (do not saw) with a sharp knife.
OLYMPUS DIGITAL CAMERA             OLYMPUS DIGITAL CAMERA    OLYMPUS DIGITAL CAMERA

Sunday, February 7, 2010

Happy Birthday, Charles!

All the knives and forks were working away at a rate that was quite alarming; very few words were spoken; and everybody seemed to eat his utmost in self-defense, as if a famine were expected to set in before breakfast time to-morrow morning, and it had become high time to assert the first law of nature.

                             --Charles Dickens, Martin Chuzzlewit

                              Born February 7, 1812

Clearly, he knew my family.

Happy Birthday, and a toast, to my literary idol.

Friday, January 1, 2010

“Take a cup ‘o kindness. . .


OLYMPUS DIGITAL CAMERA         . . . for auld lang syne” (Robert Burns 1788).

What kinder reminder of auld acquaintance than an award-winning 1995 bottle of Westport Rivers brut cuveé RJR from just over the Little Compton line? Like an old friend, full of life and beautiful as the day we met, after all these years. And the better for them.

I have not forgotten you, my old friends, despite having been so absent from the kitchen blog, if not entirely from the kitchen itself. Christmas in New York was beautiful, and Christmas Eve dinner was, my son and I agreed, one of the best dinners we have ever eaten. Together makes the simple sublime.

Wishing you a New Year of of health, contentment, and simple food, together. A cup 'o kindness is my best recipe; feel free to share. Happy 2010.

        OLYMPUS DIGITAL CAMERA           OLYMPUS DIGITAL CAMERA                                                           

Sunday, November 29, 2009

Holiday Breads I: Challah


Challah eggs I confess that sometimes I forget I have a blog, and by the time I remember, I’ve made something nice, and it’s already done, and there are no in-progress photos. So I skip it as a subject for the blog.

This time, though, is different. Everyone should know how to make a good, impressive—and very easy—bread for the holiday table. Something simpler and less expensive than, say, a great stollen or panettone (which, shockingly, some people don’t like). So even though I forgot to take photos, it’s that time of year and you may need or want this recipe for challah. I’ll do my best at directions for the braiding. (I also made another bread today, but had already frozen it and only had a half-eaten slice with butter on it to photograph . . . too questionable even by my low standards for what constitutes food worth looking at.)

Why all the breads? Aside from the fact that I love bread, of course? My department is having a holiday pot luck lunch this week, and my contribution is a bread basket. There will be a wonderful New England 100% whole wheat brown bread with raisins and nuts—the one already in the freezer; a huge fougasse in the shape of a Christmas tree; my buttermilk dinner rolls to satisfy the Southerners; some cornmeal crackers; a few loaves of French bread made with poolish and a little whole wheat; and this challah. I have also been pressed to bring one of last year’s contributions again, the ever-versatile and vibrant apricot chutney.

Challah is a traditional Jewish bread served at holidays in various shapes, most notably braided, but also wound into a smart turban or little knotted rolls. My father used to call it Jewish egg bread when I was little, and that about describes it. It is eggy, but contains less egg, butter, and sugar than many enriched doughs, giving it a finer texture and making it suitable for sandwiches, French toast, and eating with butter. Unlike some of its more decorated cousins, it falls squarely into the bread rather than the dessert category. This is, I think, why most people like it. While I am a totally egalitarian bread eater, welcoming all comers, I am very fond of challah. It makes a great ham sandwich. Ironic, I know.

Challah

One of the easiest ways to impress your boyfriend’s mother, or make her fear you will replace her. Freeze the whites for later use. Makes 1 huge loaf.

1 package dry yeast
2 tsp sugar
¼ cup warm water

4 ½ cups bread flour, more if needed
2 tea salt
2 large eggs
1 large egg yolk
2 T unsalted butter, melted and cooled
1 cup lukewarm water

1 large egg yolk
poppy seeds

Sprinkle the sugar and yeast into the ¼ cup water, stir, and set aside for a few minutes. Butter a half-sheet pan.

Beat the eggs and 1 egg yolk with the butter. Sift the flour and salt into the yeast mixture. Add the egg-butter mixture and the cup of water. Mix until blended and turn out onto a floured board. Knead until smooth, incorporating a little more flour if needed, about 6 or 7 minutes.

Place into a large greased bowl and cover with plastic wrap to rise until double, about an hour. Punch down and let rise again, about another hour.

Preheat the oven to 375 F.

Divide the dough into two pieces, one about 1/3 of the dough, one about 2/3. Set the smaller piece aside, covered. Pat the larger piece out to about 12 inches and cut it into thirds lengthwise, and roll the pieces into ropes with slightly tapered ends. Place them parallel to each other, an inch or so apart, then join them at the top, tucking under the ends. Braid, crossing from left over the center, then right over the left (now in the center) and so on, always crossing alternate sides over the piece that lands in the center. Pull the ends together at the bottom and tuck under. You can do the braiding on the counter and transfer it to the buttered baking sheet, or do it directly on the sheet.

Repeat the braiding procedure with the smaller piece. Make a slight indentation down the length of the braid on the sheet, and brush with water. Place the smaller braid firmly on top, integrating the ends. Mix the final egg yolk with a few drops of water; brush the bread gently all over and sprinkle lightly with poppy seeds. Bake in the middle of the oven for about 45-50 minutes, until it is a lovely mahogany color and is firm at the intersections of the braids. Remove to a rack to cool.


                                                    OLYMPUS DIGITAL CAMERA

Sunday, November 22, 2009

Egg Noodles

OLYMPUS DIGITAL CAMERA         OLYMPUS DIGITAL CAMERA

You’ve all heard about my Pennsylvania German grandmother, who, as the song Billy Boy goes, could “bake a cherry pie quick as a cat can blink her eye.” It is hard not to think of her at this time of year, or anytime, really, when cooking or digging into a whole lot of traditional but high-quality food.

Beyond the endless baking and holiday foods, one thing I always associate with my grandmother is egg noodles—with gravy. This is what we usually had growing up as an accompaniment to goulash (meat stew) or pot roast. The pot roast or goulash had lots of rich, beefy, tomato-tinged gravy that would be ladled out of the pot onto the noodles. It was great with the meat. But what I really loved was the next day, when the meat was all gone, but there was leftover gravy, and you could have a meal of the noodles and gravy all alone. This held true for leftover gravy from a chicken or, of course, turkey. You see where I’m going.

I will not be cooking Thanksgiving dinner this year, or any part of it. I tried to calculate back how long it has been since I’ve not prepared the entire Thanksgiving meal or, on the rare occasion, a major contribution to it. I think it is 30 years.

So I am not going to have turkey gravy. But you probably will, and I encourage you to have some of it over some tender egg noodles. And even though I won’t have gravy, I do have some excellent chicken stock in the freezer. So when I saw some homemade egg noodles at the farmer’s market, made by a Tennessee Amish community, I bought them, partly from wonder that they existed here. Who knew? Apparently, the Amish have been migrating from strongholds like Pennsylvania to the South, with Kentucky, Tennessee, and even Texas among their final destinations. Seeing their stand of baked goods, eggs, butter, and these noodles at the farmer’s market was like seeing a mini version of my beloved Reading Terminal Market in Philadelphia. And of course, reminded me of my grandmother’s food.OLYMPUS DIGITAL CAMERA

I made some of these noodles for my dinner last night, very plain. Instead of thickening with flour into a gravy, I just made a light sauce by caramelizing some onions and reducing good homemade stock down until it thickened a bit. Not like good gravy, but good.

Noodles and apples go nicely together. I happened to have some gravensteins and a local variety, Arkansas Black, on hand, and made some apple sauce and a crisp with the extras—a fitting dessert for the plain noodles. Grandma would have approved.

Egg Noodles with Onion Sauce OLYMPUS DIGITAL CAMERA

These noodles were about the size of fettucine. For true noodles and gravy, I like a broad egg noodle. Two reliable brands are Mueller’s and Pennsylvania Dutch. Of course, you can make your own, too. Just cook til tender, and pour the hot gravy over.

For a lighter facsimile:

Heat until bubbling 1 tea olive oil and 1 T butter

OLYMPUS DIGITAL CAMERA         Slice thin ½ medium-large sweet onion and sauté over medium-high heat til they brown a little and turn golden, and are about half-cooked. Season with salt, pepper, and a little freshly grated nutmeg.

Add ¼ cup good homemade chicken stock, reduce heat to medium and cook til most of it is absorbed. Repeat twice more (another ½ cup), each time reducing a little less, then add a final ¼ cup stock, for a total of 1 cup, reducing just a little; you should have enough sauce to toss with 6-7 oz of noodles, or for two servings. Garnish with chopped parsley.

OLYMPUS DIGITAL CAMERA         OLYMPUS DIGITAL CAMERA

Saturday, November 7, 2009

Red Poblanos: The Perfect Heat

OLYMPUS DIGITAL CAMERA         It’s late fall, when the end of the growing season often brings some nice surprises, especially after a disappointing summer of rain and sorry produce. One discovery a few weeks ago was these beautiful red poblanos, brilliant and shiny. Poblanos are already a favorite of mine, in frequent use around my house for a staple in my house, chiles rellenos (recipe to come, I promise), or for making one of my favorite burgers or this simple first course of cornmeal-dusted sautéed peppers.

The red poblano is both a little sweeter and a little hotter than the green, which among all the chiles is relatively mild. It retains a distinctive poblano taste, however, and was satisfying and very pretty for chiles rellenos. Once roasted, however, they looked so much like any other roasted red pepper that I began thinking about what else to do with them.

As many of you know, I spend the academic year in Nashville. The South is a generation behind; this is not a criticism, just a fact. What is available here, and what people like, is reminiscent of the East Coast in the early 1960s. One of those things that people like is pimiento cheese. Now, we didn’t have that growing up, but we did have various kinds of cheese spreads, like WisPride®. Pimento cheese is a little bit like that, and everybody here just loves it. They sell it in the supermarkets—which are, regrettably, like ours were 30 years ago—in big tubs. Of course you don’t want that. But a homemade pimento cheese can be a very nice, even addictive, thing.

When friends from Rhode Island were visiting last month, I made some pimento cheese and some roasted pecans to give them a taste of the South. My girlfriend said, with a note of horror and shock that I would serve such a thing, “it looks like CheezWhiz®.”I told her it was good and, out of politeness or hunger, she tried it. She ate it right up.

Anyway, I used some of these peppers to make a batch of pimento cheese. Their natural heat negated the need for Tabasco and cayenne, standard ingredient when using regular roasted peppers. I can be quite content eating pimento cheese and crackers, accompanied by a cold beer, for my dinner when I get back late from teaching an evening class. A little Southern comfort, far from home.

Poblano Pimento Cheese

Pimento cheese is a subject of fierce debate in the South, like jonnycakes (thick or thin?) or chowder in Rhode Island. Serve only with 60s-era crackers: Ritz™, or my personal favorite, Club™. Or in celery, also very 60s. Southerners eat pimento cheese sandwiches, on white bread. Makes about 1 ½ cups.

Since red ripe poblanos may be difficult to find, I provide alternate instructions for using roasted red bell peppers. This is a loose interpretation of a recipe from a nice Southern cookbook, Martha Hall Foose’s Screen Doors and Sweet Tea. You may be tempted to use a food processor. Don’t.

8 oz. very sharp yellow cheddarOLYMPUS DIGITAL CAMERA
1/3 cup, scant, mayonnaise (Hellman’s or homemade)
1 ½ medium red ripe poblanos, roasted and peeled (or 2-3 oz. jarred or home-prepared roasted peppers/pimientos)
½ tea dry mustard
¼ tea dried sage
½ tea Worcestershire sauce
salt and freshly ground pepper to taste

If using regular peppers, also add:

1/8 tea ground cayenne pepper
Tabasco to taste

In a small bowl, mix the mayo, mustard, sage, Worcestershire and, if using standard peppers, the cayenne. Grate the cheese on the largest holes of a box grater and add, mixing.

Using the tines of a good fork, mash the peppers on a board until they are a small, dicey mush. Add them to the cheese/mayo mixture and whisk around with the fork. Season with salt, pepper (and if needed, Tabasco) to taste. Cover and refrigerate for a few hours to let the flavors meld. Take out about 10 minutes before serving.

OLYMPUS DIGITAL CAMERA                OLYMPUS DIGITAL CAMERA