Monday, December 31, 2007

Lobster and the New Year: Last Hurrah

Lobs 5 copy There is the blue lobster like the one owned by my local market—and their prior one, a taxidermied giant now gracing the wall near the check-out counters like a fantasy sculpture you’d see over the door of some dive with a name like “The Shipwreck Bar.” There is the equally fantastic, yet also real, two-toned lobster, vertically divided with hairline precision down its length, half-black, half red, the second one caught by one of my neighborhood purveyors, Sakonnet Lobster—a 1 in 50 million chance. And then there is the last lobster—of the year, that is.
For it’s not just the end of the year, it’s the end of lobster season. Come January, the vast majority of lobstermen pull their pots until spring, repairing them and their boats until the water warms enough to bring the lobsters, pretty much too cold to move from the bottom, back to the surface. Although they are scarce and therefore expensive—not that they are ever cheap—now is the time to have a fresh-caught lobster before they disappear for the winter months, and nothing is available but “held” lobsters, caught previously and kept in tanks or other special holding areas for who knows how long and under what conditions. Eating lobster, accompanied by its perfect match, champagne, seems a fitting way to send off both the year and the winter-torpored arthropod.
My favorite way to cook lobster is to grill it over charcoal, but the season, at least here, is not conducive to outdoor cooking. And maybe, just maybe, the preparation is a bit summery anyway; certainly boiled lobster with drawn butter doesn’t attract the way it does on the 4th of July, when bright sun, a pile of steaming lobsters, drawn butter, lobster bibs, and wooden picnic tables overhanging the pier are akin to a holy tableau. You could bake and stuff your last lobster of the year, a favorite New England preparation, and certainly a warming one. But for New Year’s Eve, one must approach the uncertainty of the turning point in Time’s relentless march—will it be a good year? A bad year? A same old, same old year?--with the defiance, confidence, and dignity so well-represented by the luxurious splurge: lobster bisque and champagne. As you head into the unknown of 2008, only the best will do.
Jane’s LC Lobster-Corn Bisque
This soup is my Rhode Island variation on the classic French haute-cuisine lobster bisque, made with the addition of corn and simplifying the steps a little while preserving the intensity and fineness of the finished product. While not quite as complicated as the original, it still takes a bit of time; I suggest making it over two days, dealing with the lobsters one day, then actually preparing the soup the next. Westport Lobster in Westport, MA, was kind enough to provide me with scarily huge extra lobster carcasses for the stock. Ask your own lobster purveyor or fish market to save you some. If you do not have corn stock (shame on you!), you may substitute a light homemade chicken stock or use all lobster stock. Serves 6.
A 2# lobster
12 cups water
About 2-3 lbs lobster bodies (torsos)LobsBisq veg 2 copy
2 large bay leaves
12 peppercorns
¼ tea red pepper flakes
6 sprigs parsley
6 sprigs cilantro
salt
4 T unsalted butter
2 large cloves garlic, minced
1 ½" piece fresh gingerroot, minced LobsBisqPuree2 copy2
½ large sweet onion, roughly chopped
1 large carrot, roughly chopped
1 large stalk celery, roughly chopped
1 ½ cups corn off the cob, thawed if frozen
¼ tea saffron, coupe grade
1 cup dry white wine
½ cup homemade plain tomato sauce or, if not on hand, imported ground tomatoes
1 quart corn stock, or use all lobster stock or light chicken stock
2 cups strong lobster stockLobsBisqPuree3 copy
salt, pepper
3 T converted white rice
2 T cognac or brandy
¼ cup or more heavy cream
Reserved lobster meat for garnish
Chopped parsley for garnish
In a small stock pot or other pot of at least 16 cups capacity, boil the water and plunge the lobster in head-first, covering with the lid. Boil 15 minutes, remove the lobster with tongs to a colander (reserving the water), and rinse well with cold water. Cool until you can handle it, then remove and refrigerate the meat, reserving the body with the others (see Note).
Preheat oven to 400 F. Clean the lobster bodies of any tomalley, roe, and head sac (you may keep the tomalley for stirring into the soup, but I do not); place them into a buttered roasting pan and roast for about 40 minutes, or until they smell lobster-y. Add ½ cup of water to the hot pan to deglaze, then add the bodies and the deglazed liquid to the pot of lobster water, pressing them down to submerge as well as possible; add the bay leaves, peppercorns, pepper flakes, cilantro, and parsley. Bring to a boil, skim, and then reduce and simmer for about 2 hours. Near the end of the cooking time, add a little salt and taste. It should have a deep lobster flavor. Remove the bodies with tongs, letting them hang over the pot for a minute to drip their juices, and discard; you should have about 2 ½ quarts. Remove two cups broth and freeze the rest for future soups or chowders. At this point you can either proceed or refrigerate the 2 cups broth, covered, until next day.
In a Dutch oven or other pot of at least 16 cups capacity, melt 3 T of the butter. Add all the aromatics and vegetables except for the corn and cook over moderately high heat, stirring so they don’t scorch, for about 8-10 minutes, or until the vegetables are brown. Add the corn and the other T of butter and cook, stirring, for about 5-6 minutes. Dissolve the saffron in the wine and add to the pot along with the tomato sauce; let it boil 2-3 minutes.
Add the corn and lobster stocks to the pot (6 cups total). Bring to a boil, skim the foam from the edges, and reduce and simmer, lid ajar, for 1 ½ hours. Add a large pinch of salt and a few twists from the pepper mill; taste and correct seasoning. Add the rice and simmer for an additional 30 minutes, stirring occasionally.
Using a food processor or an immersion blender, puree the broth and vegetable mixture. Strain through a conical strainer (a “China cap”) or other fine sieve into a 3 qt saucepan. Refrigerate until serving time.
Bisq Garnished 3 copyTo serve: Reheat the pureed soup base over medium heat. Heat and ignite the cognac, and pour it into the soup. Stir in the heavy cream; this is one of the unusual instances where less is more. Serve in shallow bowls (the classic is a white two-handled cup or shallow, rimmed dish), garnished with the reserved fresh lobster meat and a little finely chopped parsley or other compatible herb. Don’t forget the champagne.
Note: In Rhode Island, as along most of the New England coast, children learn how to remove the meat from a lobster before they know how to tie their shoes. If you are, as they say, “not from here,” you can follow these directions. I use minimal water when making stocks; just cram the bodies into the pan, crushing the shells down if needed.

Monday, December 24, 2007

Tree card

I heard the bells on Christmas Day; their old familiar carols play, and wild and sweet the word repeat of peace on earth, good-will to men!

--Henry Wadsworth Longfellow, "Christmas Bells," December 25, 1864

Saturday, December 22, 2007

Dates: Gooey Delight

Dates 1The date palm is a large family of trees that produces an astounding variety of dates, ranging from soft and sweet to dry and not-so-sweet. In the Middle East, where they have been cultivated for thousands of years compared to the few hundred here (brought by Spanish missionaries to California in the 18th century), some countries grow hundreds of cultivars. In the United States, only a few varieties are grown, limited to the hot, arid regions of California and Arizona. The semi-dry, smooth-skinned, somewhat delicate Deglet Noor accounts for the vast majority of American production, and is generally eaten out-of-hand. The cultivar prized for baking is the large, soft, very moist Medjool, grown in California from stock originally brought from Morocco. The most luxurious of these are huge, the result of careful thinning of the fruit during cultivation. All dates of all varieties are high in potassium, amino acids, vitamin A, and dietary fiber. They are also traditional soothants for intestinal disorders and sore throats; it’s even said they have a sobering effect, literally, on those who drink too much, somehow countering the effects of alcohol.
Luscious, fat, and exotic, dates are favorites at the holidays. They are a stone fruit or “drupe” like olives or peaches, with a central seed surrounded by a fleshy wall. This makes them excellent for stuffing—with cream cheese, almonds (whose shape fits nicely into the elongated cavity left by the pit), or glacé orange peel; you can roll them in coconut or, of course, dip them in dark chocolate. Date puddings (including steamed puddings), cakes, and ice creams are other popular uses. But the primary way I use them is in a seemingly endless quest to replicate Thomas’® Date Nut Loaf. Those of you of a certain age know exactly what I’m talking about, as you, too, think longingly about date-nut and cream cheese sandwiches, made as a snack after school or, if you were incredibly lucky, sent to school with you as your lunch when there was nothing else in the house. The Thomas’® loaf was very small, perhaps 10 ounces, baked in a crinkly paper liner like a muffin cup (yellow, I seem to recall), and wrapped in pre-plastic cellophane. It was very, very dark, and very, very moist, and the top—ah, the top!—was very, very gooey. It was heaven. Somewhere along the way, probably in the misguided 1970s or cost-cutting 1980s, Thomas® stopped making it except for a month or so around the holidays, and ultimately stopped making it altogether. It is now food history, and we can only, with hope and perseverance, try to remedy this egregious error of branding judgment by seeking to recreate it on our own.
Almost-Thomas® Date Nut Bread #1
This is one of several variations I’ve developed in my quest to clone the quintessential Thomas’® date-nut loaf; another adds a little graham flour and has no egg. I'm still experimenting, but for now, this one will do. Use at least a pound of best-quality dates, or you will not come anywhere near the real thing. Makes 1 loaf; may be doubled.
1 lb giant Medjool dates, pitted and quartered, halved if on the smaller side
¼ cup finely chopped glacé orange peel (optional)Date Mix 2
3/4 tea baking soda
1 T unsweetened cocoa
1 tea instant espresso powder, such as Medaglia D’Oro
½ cup boiling water
½ cup unsalted butter, softened
3/4 cup brown sugar
1/8 cup dark molasses
1 egg
1 tea vanilla
2 cups a-p flour
1 tea baking powder
¼ tea salt
¼ tea each ground cinnamon and cloves
1/8 tea freshly grated nutmeg
½ cup sour milk or buttermilk
½ cup shelled walnuts, broken
Preheat oven to 350 F.
In a small bowl, sprinkle dates with baking soda, cocoa, and espresso powder. Pour boiling water over all, toss, and let stand while you prepare the batter.Date bread 2
Cream butter and sugar in an electric mixer, scraping the bowl well from time to time. Add molasses, egg, and vanilla, and beat until well combined. Sift together dry ingredients and add very slowly on low speed, alternating with the milk. Fold in the nuts and the date mixture by hand, turning it over and over until the dates are well distributed. The batter will be thick; spoon it into a buttered standard 8 ½ x 4 ½ x 2 ½ loaf pan, smooth the top, and rap the pan on the counter a few times. Bake about 50-55 minutes, until a toothpick comes out clean and the top is brown. Turn out of the pan. And now, the secret to having any chance at all of achieving the genuine article: While still warm, double-wrap tightly in foil. Let it stand two full days on the counter before cutting to allow it to settle and densify, and the top to turn gooey. Slice thinly with a thin bladed slicing knife and serve with good cream cheese.
Date bread cut 2 Date bread cream cheese 2

Friday, December 14, 2007

Short Work: Filling the Cookie Tins

With the plum puddings wrapped and waiting patiently in the cupboard for holiday dinner, it’s time to turn attention to cookie making. Not so long ago I used to make eight or ten kinds, packaging them in assortments of six of each, and gave them to friends and neighbors who appreciate such things. Hints, in the form of casual, reminiscent remarks about the prior year’s cookies, would start soon after Halloween each year, so the cookie making and giving became a tradition of my holiday kitchen.
I no longer live in the neighborhood of Great Expectations, and make fewer kinds each year now, but the holidays would not be the same without a plate of favorites on the sideboard throughout the season. As with everything else, I tend toward plain perfection in cookies, with a few special, labor-intensive items thrown in. These are not necessarily any better, just fancier and prettier. All good cookies are equal in my cookie jar.
Something so discrete, so absolutely stand-alone as a cookie, needs to be wonderful in its own right. What makes a cookie wonderful? Now that is a very difficult question to answer, because, as with children, each is different, and so can be wonderful in its own way. But perhaps every good cookie has a single dominant, quintessential characteristic: this one perfectly chewy, that one meltingly buttery, that one superbly spiced, another lightly crisp. Hence the beauty of the plate or tin of assorted homemade cookies: individual notes yield a symphony.
The notes matter, of course. Over the course of some 35 years of ruthless cookie recipe trials and criticism, I have found only a baker’s dozen or so of cookies that I consider worth making—and eating—over and over. A few, like the rugelach made with cream cheese pastry from Maida Heatter’s first cookie book, come straight out of books, and are sublime without a single adjustment. Others are recipes that I have found in my collection of old pamphlets and cookery books and fooled with to make work or make better, such as a chewy-soft ginger cookie that tastes like American history. And several, the best of all, are those that have been given to me by friends, strangers, coworkers, even employers. One is the best nut-coated, jam-filled thumbprint cookie I’ve ever tasted, given to me when I was 19 by a woman I cooked for at her mansion in Narragansett, RI, when her real cook refused to leave New York for the summer (I assume the recipe was that of this very cook). Another is an unusual filled cookie made with an oatmeal pastry that was one of numerous divine productions of the cook in my sorority house (her cinnamon rolls having never yet been exceeded). Others are the perfect vanilla cut-out tea cookie, a divine Florentine, a crisp brown-edge wafer, a soft, cakey iced orange cookie—and I don’t even like cakey cookies—and this authentic Scotch shortbread, straight from the mother land.
Jean MacKay’s Shortbread
Jean MacKay was the assistant in the production department at a publishing company where I worked in California in the 1970s. She dictated the ingredients and brief instructions to me in her lovely Scottish brogue, and I still have them on the same old index card. I have elaborated on the directions and proportions for clarity here, as the actual baking and amount of flour are crucial variables. You can halve the recipe or, as I often do, add finely chopped crystallized ginger to part or all of the dough. I consider this shortbread to be the ideal. Makes 32 pieces.
1 lb unsalted sweet butter, softened
1 cup sugar
1 cup sweet rice flour (see Note)
4 cups a-p flour (or less—see instructions)
½ cup finely minced fresh crystallized ginger (optional)
Preheat oven to 325 F.
In a food processor, cream the butter and sugar. Add the rice flour and pulse to combine. Gradually add the all-purpose flour, beating the dough until it is very soft but forms a clump on the blade. (Jean gave me this recipe before, if you can imagine such a thing, the advent of food processors; her instructions were to “knead well,” as for bread). I use a little less flour than the “about 4 cups” she told me, perhaps 3 ½ cups. If using, add the ginger and pulse to distribute. Divide the dough and pat out each portion evenly into a shortcake mold or pie plate, preferably a glazed porcelain or ceramic pan with a 7” bottom (this can be either an 8” or 9” pan, I’ve found); if you don’t have one, use metal rather than glass if possible.
Baking time is imprecise; Jean said “start checking after one-half hour,” and that is good advice, as you don’t want to over-bake, but the total time will more likely be 45-60 min, depending on pan material and size, and your oven. After 30 minutes it will probably still be heaving and white—not done. Look for a pale golden color and a light firmness to the touch. Remove to a rack and, while still quite warm, slice each into 16 pieces; use a small sharp knife and a short up-and-down rather than dragging motion. Let cool a little more, and sprinkle the tops with sugar. When completely cool, remove from the pans and try a piece; it should be rich and buttery, with a tender but firm, slightly crumbly, texture. Store in a tin or wrap and freeze.
Note: Sweet rice flour is available in Asian markets and occasionally in very well-stocked urban grocery stores. Jean said you could substitute Wondra® if you couldn’t find it, but I say no. Rice flour is important to getting the right balance between crispness and tenderness.

Saturday, December 8, 2007

Suet: Such a Pudding, Martha!

"Hallo! A great deal of steam!The pudding was out of the copper. A smell like a washing-day! That was the cloth. A smell like an eating-house, and a pastry cook's next to each other, with a laundress's next door to that! That was the pudding." Charles Dickens, Stave Three, A Christmas Carol, 1843

Plum pud molds 1 copyFat is the miracle worker of the dessert world. All fats contribute richness, flavor, and melting quality in the mouth; some have special properties for making products more or less flaky, firm, tender, delicate, or earthy. One can debate the relative merits of butter for cakes, lard for pies (and one does). But for steamed puddings, especially of the holiday variety, there can be little argument as to the fat of choice: beef suet.
The suet used in dessert cooking is the protective fat around the kidneys of beef cattle. It has a relatively high melting point, which means that it doesn't melt until the product is structurally sound; this results in a moist, airy grain in a cake or steamed pudding (which is really an unleavened cake) and crisp pastry. Suet is a primarily saturated fat, but it's the holiday season of forgiveness, when we try to overlook faults. Moreover, the rich but clean taste it creates cannot be duplicated with shortening or even butter; in a pudding, such substitution would make it taste greasy.
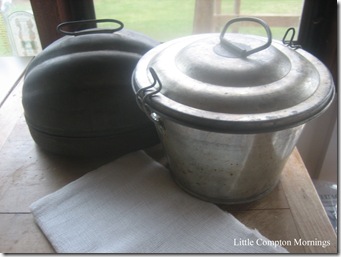
Like many things in today's era of agriculture on a massive scale, it is increasingly difficult to find good or even real suet. If you live near a farmer who raises beef, let him or her know that you would like some--although you should probably put this request in well in advance. If no farmer is hard by, your next best chance of getting suitable fresh suet is a butcher shop--but of course those scarcely exist anymore. You can buy suet in many markets at this time of year--indeed, you may have to--but you will have to buy more than you need to get a usable amount, because what's available is likely not all true suet and Suet pieces copy
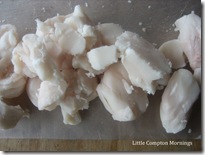
what is may have been frozen for long periods as well, resulting in a loss of quality. Fortunately, suet is relatively cheap and buying a lot in order to sort through it is possible. For the recipe below, buy at least a pound. Look for suet that appears to be smooth, creamy white to slightly pinkish and somewhat glossy, and in clumps rather than chunks or strands. Choose a package that contains as little fat with a powdery or sawdusty look as possible; this is either old/over-frozen, or not true suet. At home, you will need to pick it over. First, brush or wipe off any loose powder, and begin to pull it apart; it is held together by fine, papery connective tissue that comes right off, leaving you with clean, creamy bits. These are the pieces you want to use. The rest is for the birds, literally. You can thread it on a skewer, securing the end with a small apple to prevent it sliding off, and hang it outside. Recently, a suet product cut in small pellets or shreds has become available, but I have not tried it.
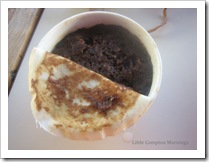
Steamed puddings made with suet include the famous "Spotted Dick," Sterling pudding (a molasses pudding), and a lovely carrot pudding that makes a nice winter dessert. Not only are steamed puddings easy and quite fun to prepare, they make successful, welcome gifts: many people have never tasted one, and are pleasantly surprised by their rich, moist, fragrant crumb and undeniably festive serving ritual. You can make small ones in mini bread pans, small coffee bowls, or even muffin tins (use paper liners). A little goes a long way.
The classic, of course, is Plum Pudding, sometimes called Christmas Pudding or Suet Pudding--all slight variations on a theme. I am a little late this year, but generally try to make my plum puddings the Sunday after Thanksgiving to let them ripen for Christmas. In England it is customary to have every family member stir the pudding once as it sits, and this is sometimes called "Stirring Sunday." Plum puddings do not absolutely need to age--they will be very good if you don't get around to making them until a week or even day before--but on the other hand, some aging is beneficial, and even a lot doesn't hurt. I have occasionally found a small, neglected pudding in the back of a cabinet or the freezer from the year before, nearly indistinguishable from the carefully tended. If you want to keep an extra on purpose for Easter or just because, remember to unwrap and douse with brandy from time to time.
Universal Plum Pudding
Though Mrs. Cratchit did confess that she had her doubts about the quantity of flour after her ever-supportive husband declared her pudding "a wonderful pudding"--"not at all a small pudding for a large family"--the fact is that plum pudding is fool-proof: the recipe is completely flexible, the cooking relatively insensitive. So I have written this recipe for plum pudding, which I have been making according to this basic formula for more than 30 years, in a manner that reflects that easy-going quality. Don't for one minute hesitate to try it.
In my family, we eat plum pudding with dinner, served alongside what was the turkey when we were young, and the prime standing rib roast as we became more prosperous. This was yet another of my grandmother's ways: plum pudding is usually served as dessert (we had pies). The sauce is also "her" sauce, at least as close I have ever been able to come to replicating it. Which is pretty close.
Start these a day ahead of steaming (two days won't hurt if things get hectic). Makes enough for molds totaling about 8 cups capacity (although you won't fill them all the way), and to serve a small portion (which is what you want) to 12-14. The recipe may be doubled. Suet chopped copy
1 3/4 cups beef suet, chopped or ground fine
2 1/4 cups fine fresh white bread crumbs
1 1/2 cups seeded muscats or, if unavailable, another large chewy raisin such as Monukkas
1 1/4 cups other dried fruit, mixed in any proportion or alone (such as currants, cranberries--preferably unsweetened--, apricots, figs, and/or pineapple)
1 cup mixed citron, orange peel, and crystallized ginger, in any proportion (my preference is for about half ginger)
1/2 cup a-p flour
1 large apple or pear, peeled and chopped (optional)
1 1/2 T Vietnamese cinnamon
1/2 tea ground cloves
1/4 tea cardamom
1/2 tea freshly grated nutmeg
1/2 tea salt
1/2 cup unsulphured molasses (dark or "full flavor," not black strap)
2 large eggs
3/4 cup good but not great brandy, whiskey, or bourbon
Another 1/2 cup or more brandy for soaking and igniting.
For the crumbs: trim crusts of bread, tear into large pieces, and process 'til fine. Use a fine-grained, plain white loaf, not a sourdough or chewy-textured bread.
For the suet: After cleaning and picking over as described above, put in the food processor with a large pinch of flour and process until it looks like your bread crumbs. Don't overdo or it will begin to form a paste; you want it to distribute well into the batter.
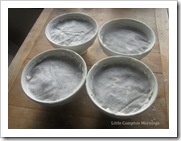
To prepare molds: Butter the insides well, paying special attention to crevices. Using the mold as a tracing guide (turn the mold upside-down), cut out a piece of clean white cloth (I use old sheets) to fit the opening. Butter and flour the cloth on one side.
Plum pud dry 1 copy
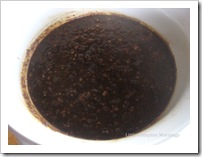
Put all the dry ingredients into a large bowl and toss well. Pour the molasses into a 2-cup glass measure to the 1/2 cup line; add the brandy to the 1 cup line, then beat in the eggs. Pour over the dry ingredients and stir in well. Cover with plastic wrap and let sit on the counter overnight (two is fine). Stir from time to time, adding a little more brandy or some apple cider to maintain a thick but still somewhat fluid texture if it becomes too stiff; do this once more before cooking.
Fill the prepared molds about 2/3 full; with your fingers, press it lightly into any corners, and try to have batter, not fruit, touching the sides. Lay the buttered and floured cloth upside down on the batter, smoothing it down gently. Cover the mold with its lid (if you have pudding molds) or, if using bowls or pans, with aluminum foil secured with kitchen string or double elastic bands (I use elastics, which can break part-way through cooking, but not so soon or often as to matter).Plum pud wet 3 copy
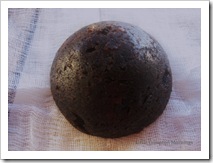
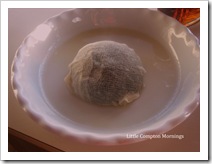
Boil a large kettle of water. You may steam your pudding on top of the stove on a rack in a Dutch oven or other large, deep pan with a lid, or in the oven; this is useful when you are making a lot of small puddings, which you can place on a rack in a big roasting pan and cover with its lid or heavy duty foil. Pour the boiling water around the molds until it reaches half-way up their sides. If using the oven, find the temperature that will keep the water at a simmer--350-400 F. Steam about two-three hours for small-medium puddings and six hours for medium-large; the pudding surface should swell a little, feel firm to the touch, and will pull just slightly from the sides, like a cake; the suet particles will have disappeared. Remove to a rack, remove and discard foil, and gently peel back the cloth and discard. Cut cheesecloth large enough to wrap the puddings and place on the
Plum pud ready copyPlum pud in pan copycounter; put about a half-cup of brandy into a shallow dish. Turn the puddings out smartly onto the cheesecloth while they are still hot; they should be very dark, almost black, a sign of good quality, with no visible traces of the suet, all of which should have melted. If any pudding bits remain in the mold, simply lift them carefully and press them down onto the pudding where they belong, smoothing the edges; they will blend right in. Wrap the cheesecloth around the pudding, and immerse into the dish of brandy, turning it over and over until all the cloth is saturated but not drippingly so (press gently to drain excess). Wrap in foil. Once every week or two up to the time of serving, open the foil and douse the pudding lightly; its should be kept moist but not wet.
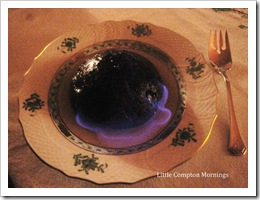
To serve: Place the cheesecloth-wrapped pudding into a steamer and steam for about half an hour (although I confess to having simply microwaved them 'til steaming hot). If you are not the ceremonial type, unwrap, place on a serving plate with a shallow rim, and serve with the sauce. If you are a traditionalist, top with a sprig of holly, pour a shot-glass of brandy around the pudding, ignite it, and send blazing to the table. Applause is likely (and de rigueur): take a bow.
Plum pud cloth 2 copyPlum pud 5 copyPlum pud 3 copy


Grandma's Pudding Sauce
There are many wonderful sauces to accompany steamed puddings. The traditional sauce for plum pudding is hard sauce, which is creamed butter, confectioners' sugar, and flavoring; it goes on "hard" and melts. I don't particularly like it, and neither did my grandmother. Here is the one our family likes--as I have managed to recreate it. I don't think my grandmother used an egg, but I can't get close enough without it; the rest, and the taste, is about right. It's rather boozy (although not nearly as boozy as my grandmother made it); you can cut the liquor in half if you wish--or add more. Plum pud flame 2 copy
1 T unsalted butter
1 T flour
1 cup boiling water
3/4 cup confectioner's sugar (10x), generous, or scant 3/4 cup white sugar
1/4 cup bourbon or whiskey, more or less
1/4 tea or more freshly grated nutmeg
1 large brown egg
In a one-quart saucepan, melt the butter and stir in the flour (i.e., make a roux), being careful not to let it color at all. Let it bubble nicely and then gradually stir in the water
until thick. Add the bourbon or whiskey and let it bubble for a minute or so, stirring. In a small bowl, beat the egg and beat in the sugar and a pinch of salt. Take the pan off the heat and slowly whisk in the egg/sugar mixture; stir in the nutmeg. Put the pan backPlum pud cut 2 copy on the heat and, over moderately low heat, let it bubble again for another minute or two. The sauce should remain smooth and the egg should not cook. It should look translucent, speckled, and pale beige. Taste, and add more nutmeg or liquor if you like. Remove and pour into a small pitcher or bowl; if all goes well, no need to strain. Refrigerate if you make it the day before; it will keep nicely for several days. Reheat slowly to just barely warm/to restore fluidity.

Saturday, December 1, 2007

Glistening Glacé: Let the Holiday Baking Begin

Glace fruit 7 copyThe boxes have arrived: ten pounds of dried and glacé fruit. Cherries, citron, orange and lemon peels, dates, pineapple, apricots, three kinds of raisins. Plus pristine whole blanched almonds and freshly shelled hazelnuts, pistachios, and pecans. For the next three weeks, it’s into the baking black hole, that place where the world disappears and there is nothing left but my kitchen, where time really is relative and normal needs for eight hours of sleep are suspended without the slightest difficulty, where actions are concentrated under one bright, microscopic lens, my workspace.
The ingredients are as exciting and abundant, in their own pantry way, as summer's earthy produce. If sour cherries and currants are summer's gemstones, surely glacé fruits are winter's. And if glacé fruit weren't so sticky, you just might string it up and wear it, or pin some to your winter coat. It sparkles, like all good jewelry.
If you're wondering whether glacé fruits are the same as candied fruits are the same as crystallized fruits: well, sort of. All will have been cooked in sugar and water to start with, and the terms glazed and candied are often used interchangably. They may be finished differently, however. Crystallized fruit is generally sugared after being cooked in a syrup; though a root, not a fruit, ginger is the classic example. Very fresh crystallized ginger is a hot and sweet treat that I always have on hand to satisfy that after-dinner sweet craving. True glacé fruits are just-ripe fruits cooked in water and then preserved in a sugar syrup in a multi-stage process. Over the course of several days, weeks, or even months, the fruit is heated and steeped in syrup of increasing sugar concentration, gradually replacing a significant percentage of the water content of the fruit, and then dried.
Sensitive to the vagaries of timing, technique, and moisture, glacé fruit qualifies as an artisan product. Historically, glacé fruit falls into the category of luxury food items, traditionally reserved for holiday eating and baking; indeed, the heavy cake of fruit barely held together by other ingredients was nothing so much as a demonstration of bounty, sort of like having a clutch of black truffles or pound of best beluga on your table. Today, quality glazed fruit still commands a premium price, and a fine fruitcake is still a splurge. Indeed, the price can seem like a barrier because it is hard to buy good quality in small amounts--certainly not in the quarter- or half-cup amounts that some recipes might call for. Fortunately, because glazed fruits are essentially preserved fruits, they keep extremely well, and can be frozen. While you may not use cherries much after the holidays (although they are surprisingly good folded into vanilla ice cream or plain white bread for toasting), peels are versatile in the kitchen year-round, in baking, candy making, Asian cooking, and just to nibble on. Another strategy is to divide and conquer: buy a pound, and share the cost with a friend.
Working with glacé and sugared fruits is a sticky job. I use a sharp chef's knife for slivering or fine chopping, and use scissors when I want larger pieces--e.g., to cut cherries in half or apricots into quarters. Keep a damp cloth at hand as you work and wipe the blade of your knife or your scissors frequently.

Maple Ginger Orange Peel Bread
Recipes for orange peel bread are in some of my early 20th century cookbooks; my adaptation is richer and denser, with a more complex flavor. Use the finest and freshest fruit you can find and afford; as always, quality makes a huge difference (see note for sources). This tight-crumbed, moist bread is suited to the paper-thin slicing that makes fruited products satisfying rather than overwhelming. It makes great sandwiches with cream cheese, butter, or a little homemade deviled or plain ham (see note below)Glaceorgang ginger 1 copy.
1 ¼ cups glazed orange peel
¼ cup crystallized ginger
2 T unsalted butter, melted
2 large eggs
½ cup sugar
Scant ½ cup 100% maple syrup
3 ½ cups a-p flour
5 T baking powderOrgan peel batter
¼ tea cardamom
1 ½ cups sour milk
For glaze: 2 T apricot jam, 1 T water
Preheat oven to 325 F. Butter a 13x4.5x2.5 loaf pan; line with waxed paper, butter the paper, and flour the bottom and sides of the pan. You could also use a standard 8.5x4.5x2.5 bread pan plus one mini bread pan.
Slice the ginger and the peel into fine slivers; pack lightly to measure, and set aside. In a large bowl (use a standing mixer if you have one), beat together the melted butter, eggs, sugar, and syrup. Gradually add the dry ingredients and the milk alternately, beginning and ending with the dry. Beat a good four minutes until well combined, scraping the bottom of the bowl if necessary to incorporate all flour; the batter will be thick. Fold in the orange peel and ginger, distributing well.
Pour the batter into the pan and let it sit on the counter for 15-20 minutes. Just before putting it in the oven, decorate with a few thin slivers of orange peel, laid diagonally on the batter. Bake until a toothpick in the center comes out clean; for the long loaf pan, this is 50-55 minutes. Start checking after 40 minutes. The top will split near the end of the cooking (one aggressive old recipe even tells you to slash the top part-way through in a pre-emptive move). Surface will be dry and pale.
Remove to a rack. Melt 2 T apricot jam with 1 T water in a small saucepan and brush over the top of the cake while warm. When cool enough to handle the pan, turn the bread out and allow to cool completely on the rack. Wrap well. If you bake a standard and a mini, you may consider the latter an extra and eat it Orange peel bread 1 copyall.
Note: If you live in a city, you can probably find good quality fruit at this time of year: try the Italian, Eastern European, or German neighborhoods or look for specialty nut and candy shops. In Boston, I used to go to Dairy Fresh Candies in the North End (they don't carry quite as much as they used to); in Philadelphia, Nuts to You; the stores generally have a more comprehensive selection than is sold online. Other online sources include www.nutsonline.com, in New Jersey.
To make deviled ham: Cut a 1/2 lb slice of smoked ham into chunks and toss in the food processor with 1 tea mayo, 1 tea minced onion, 1-2 tea Dijon mustard, a T each of golden raisins, maple syrup, finely chopped dill pickle, and cider or orange juice. Add a dash of salt, white pepper, and allspice. Whiz a few minutes until it forms a loose, spreadable pate.

Orange peel bread cut copyOrange peel bread cut 3 copyOrange peel sandwiches 1 copy

Sunday, November 25, 2007

Pumpkin: After Pie, Beyond the U.S.

Pumpkins 3 vRaised under my grandmother’s tutelage in the waste not, want not school of cooking, after Thanksgiving I feel as if I should do something with those pumpkins that have been decorating the sideboard. I’ve already made pies—and I confess, that after decades of experimentation, I prefer solid-pack canned pumpkin to home-cooked for those. So what’s a frugal kitchen maid to do?
When I was in college, we used to stuff whole small pumpkins with mashed potatoes and seasoned ground beef, and roast them until the flesh was soft and the outsides glazed and mahogany brown—cheap, hearty, and initially impressive, but ultimately rather dull, in the shepherd’s pie tradition. Some years I just roast and mash them, or make soup. Ho-hum. Not that these aren’t good, but really, what’s so pumpkin-y about them? They may just as well have been made with butternut or acorn squash. Pumpkin is a little sweeter and denser, and seems to ask for something that showcases their difference. The Italians of course make the wonderful ravioli de zucca, bathed in sage butter; it’s fabulous, and I have made it, but I’m happy to use canned pumpkin for that purpose as well—or to save eating them for dining out, and let the restaurant do the work. The Mexicans, Puerto Ricans, and other Latino and Hispanic cultures use pumpkin a lot too, both in main dishes and desserts, particularly custards. But again, canned is fine. How to really showcase the taste and texture of the fresh item had eluded me.
Then about five years ago during a conference in Baltimore, our large group ordered a pumpkin appetizer at an Afghan restaurant run by a member of Hamid Karzai’s family. It was the house specialty, but arrived looking astoundingly uninteresting— chunks of ostensibly plain cooked pumpkin sitting unadorned in a big bowl (for our crowd it was served home-style, with a another big bowl, this one of yogurt, alongside). Looks were deceiving: it was exotically sweet and tender, with a true pumpkin taste. I asked our waiter how it was made, and he said it was just pumpkin cooked in the oven with water and honey, served with a savory seasoned yogurt. There is a well known Afghan pumpkin dish made with tomato sauce and served with yogurt, but this was not it, but rather something altogether different and delicious.
As I think these fritters are—inspired by that Afghani appetizer but pushed into the dessert category with New England ingredients, and fried (thinking about Mexico made me do it, but fritters are classic New England fare). For me, they capture the sweet, fruity taste of pumpkin as pumpkin, not pumpkin as squash. Be sure to use a nice hard specimen, and if you like the seeds, clean, dry, and roast them with salt: they’re full of minerals. Pumpkin itself is an extremely low-cal, low-fat food, high in vitamin A, calcium, and potassium.
New England Pumpkin Fritters via Afghanistan
These are a bit of work, but as I always say when rationalizing excesses during the holidays, whether of the pecuniary or laborious kind, “It’s only once a year.” And you can spread it out over two days, preparing the pumpkin on one and frying them on the next; extra hands, of course, make preparation light. These are a nice dessert, and a better breakfast. Even a small pumpkin makes a lot, so if you don’t fry it all, you can eat any leftover sweetened pumpkin pieces plain with the yogurt, or mash them up as a side dish. As fritters, serves 15-20.Cut pumpkin 1
Preparing the Pumpkin (see safety note below)
1 small sugar pumpkin, about 7” in diameter
1 cup fresh sweet apple cider
¼ cup honey
½ tea Vietnamese cinnamon
2 T unsalted butter
Preheat the oven to 375 F. Cut the pumpkin into quarters and, with a large spoon, remove as much of the pulp and seeds as possible. Cut each quarter in half lengthwise, then further trim the flesh of all remaining fiber. Peel the rind with a vegetable Pumpkin for oven 2peeler or paring knife. Cut each of the now eight pieces in half crosswise, then cut into 4 or 5 pieces of ½” each, taking care not to break them as they are curved. As you cut them, put them into a non-metal baking dish (a 15x10 “lasagna pan” is good) into which you have blended the cider, honey, and cinnamon, giving them a toss. Dot with the butter. Cover with a sheet of foil and oven-stew them for about 35 minutes, until they can be pierced with a knife and the smaller pieces are starting to turn translucent. You are looking for what might be called al dente—tender, but definitely holding shape; they will cook further when fried. Remove from the oven and allow to cool in the juices. If frying the next day, refrigerate, covered.
Fritters—Batter and Frying
2 cups a-p flour
1 ¾ cups sparkling sweet cider
¼ cup strained cooking liquid from pumpkin
2 eggs, separated
Pinch salt
Mixture of corn oil and lard for frying
Heat 2” of oil and lard to 375 F. A deep, heavy frying pan of at least 12” is good for this.
Combine the flour and salt. Separate the eggs and beat the whites until just stiff; drop the yolks into the flour. Strain the juices from the pumpkin into a 2-cup measure; you should have about 1/3 cup. Remove 2 T and reserve for the yogurt sauce, below. Fill the measure to the 2-cup line with the sparkling cider. Gradually add about 1 ½ cups of the liquid to the flour, first stirring with a wooden spoon and then whisking to remove lumps; I don’t bother to strain for this. When reasonably smooth, gently fold in the remaining liquid and the beaten egg whites. With this amount of liquid, the batter will make a relatively light coating; if you want it heavier, cut the liquid by ¼ to ½ cup.
Drop a half-dozen pumpkin pieces into the batter at a time to coat, then lower them into the hot fat. Cook, turning once, until they are a uniform golden brown. Remove to paper towels to drain. Serve as you go, or keep them warm in a 200 F oven while you fry the rest. The pumpkin will now be perfectly tender. After it has cooled, strain the fat into a large spouted cup or bowl, pour it into a bottle or jar, and save it in the refrigerator for another use.
Yogurt Sauce and Serving
8 oz Greek-style plain yogurt
¼ cup 100% maple syrup
2 T strained cooking juices
Powdered (10x) sugar mixed with cinnamon-sugar for dusting
Blend the yogurt with the maple syrup and reserved cooking juices in a small bowl; garnish with a dash of cinnamon. Sprinkle the fritters generously with the 10x-sugar-cinnamon mixture, and serve with the yogurt sauce and some good, strong coffee.
Pump fritters 1
Safety Note: Pumpkins are hard and unwieldy, so take great care when cutting. Use a small, sharp knife with a rigid blade such as a good-quality 4” parer or an inflexible 6” boning knife; a chef’s knife or cleaver, while perhaps your first instinct, is dangerous for this. Cut the top out first, making small connecting cuts all around; remove, then cut down each side until you can pop it apart. Rinse/dry your hands frequently while cutting; they get slippery. When peeling, be sure to direct the peeler or knife away from you while holding the pumpkin firmly, flesh-side down, on a cutting board.

Monday, November 19, 2007

Happy Thanksgiving: Don’t Forget the Succotash!

Of course you have your own traditions. But I’d like to make a pitch for a dish that surely was part of that first feast at Plymouth Plantation, where the settlers who survived the first brutal winter of famine, disease, and cold ate, thanks to the generosity and pity of the American Indians, their first harvested crops. My grandmother insisted on this each year, and I never, ever ate it. Actually, she could not get anyone else to eat it either, except for my mother.
Now I do eat my succotash, and I love it. There is something wonderfully simple about this dish—nothing but veggies, butter, salt, pepper, and nutmeg—but nevertheless sweet, creamy, tenderly meaty, and satisfying. I use the local lima beans and sweet corn, blanched in a blink and frozen just last month, but quality commercially frozen baby limas and corn do nicely. There’s no recipe per se: just slowly heat the vegetables straight from the freezer in lots of unsalted butter and seasoning until tender. Pop in a splash of heavy cream from time to time—cream improves everything, doesn’t it?—and experience, alongside your turkey, cranberry, and pumpkin pie, the honest pleasure of a truly American meal. And don’t forget to raise a glass of Zinfandel, one of our oldest wines, and say, “thanks.” We are lucky indeed.

Friday, November 16, 2007

Cranberries


Cranberries, like blueberries, are native to North America. They grow on hearty, shrubby, long-lived vines—some in Massachusetts are said to be 150 years old—and have been cultivated since the early 19th century. Today farmers harvest about 40,000 acres a year for sale, 14,000 of them in Massachusetts alone. Being from New Jersey (another major growing area) and then spending most of adulthood in Massachusetts and Rhode Island, I’ve pretty much lived in cranberry country all my life. In the fall (usually early October), if you live near the bogs, it is quite a beautiful sight to see them flooded and ready for gathering.
The association of cranberries with Massachusetts, particularly Cape Cod, is historical as well as geographical. They were first cultivated there, and for nearly two centuries the state has been the site of most advances in methods and equipment used to grow and harvest them. As a source of nourishment, and a useful medicine and dye, they were one of the important wild plants introduced to the Pilgrims by Native Americans.
The Pilgrim connection may be why many people have traditionally thought of cranberries only at Thanksgiving, but thanks to both science and the availability of more ways to eat cranberries, that is changing. While it has long been known that cranberries were high in vitamin C (even before the scientific basis was understood, sailors used cranberries to prevent scurvy), more recent research suggests that cranberries may have promising antibacterial, antioxidant, and anti-cancer properties. In part for these reasons, cranberries in one form or another—dried, juiced, or baked into cakes and muffins—are becoming a year-round habit. I particularly like 100% cranberry juice cut with water, and use it to make mixed drinks and in cooking.
While many, many cultivars of cranberry have been developed, some exclusively for commercial juicing or other purposes, when you buy your cranberries at the market you are likely to be buying something very close to the original. These early varieties, including Early Blacks, Early Reds, and Howes (the very first cultivar, named after the Dennis, Massachusetts man who figured it all out), are still favorites for the table. Cranberries freeze well, so buy an extra bag or two for the freezer; they should not have been previously frozen when you buy them at this time of year—one of the true really fresh native products that are widely available. You can use them straight from the freezer well into the spring and early summer with no loss of quality.
Cranberry Chutney
I make a cranberry chutney every year, for serving with the turkey, but also with other meats and poultry, cheeses, on sandwiches, or as an ingredient in assembled appetizers and desserts. I have a few variations that I like, including this one. If you haven’t discovered the many uses of caraway powder (or caraway generally), here’s your chance. Don’t stop here: try it in chili or shortbread, as a few favorite examples.

2 generous cups fresh or frozen whole cranberries
1 hard pear or apple, peeled, cored, and chopped
¾ cup chopped onion
2 T finely minced fresh peeled gingerroot
Zest of a large navel orange
¼ cup fresh sweet apple cider
¼ cup cider vinegar
½ cup light brown sugar
1 tea chocolate extract (optional)
½ tea Dutch ground caraway
¼ tea salt
¼ tea red pepper flakes
1/3 cup walnut meats, broken into small pieces by hand
Combine all ingredients except the nuts in an open, preferably slope-sided, stainless steel pan. Bring to a boil and then immediately reduce the heat to the point that it is bubbling but not rapidly boiling—a medium-low to medium heat. Cook 15 minutes only; avoid the temptation to stir. Remove from the heat and gently fold in the nuts. Transfer to a serving dish to cool. Serve at room temperature.
Cranberry Cheese Cannolis
I like cheese with cranberry (in part because cheese balances the acid in the fruit), and these “cannolis” (really a stuffed frico) offer an easy, flavorful appetizer that suits the season. The chutney can be made days or even weeks ahead (put in a canning jar to store), and the frico shells can be made a day ahead, although they are best the same day. In making the fricos, I depart from tradition out of laziness: I grate the cheese coarsely rather than fine, and use the oven to avoid the tedious cooking on the stove-top. You’d think these would be fragile (like their finely grated counterparts) or drippy when filled, but they’re not. Actually, they’re delicious. Makes about 10.

10 oz very sharp, well-aged white cheddar
1 T flour
½ tea Dutch ground caraway
2/3 cup cranberry chutney, approximately
Preheat oven to 425 F. Grate the cheese on the largest holes of a box grater. Mix with the flour and ground caraway. Place a Silpat® mat on a sheet pan, and drop handfuls of the cheese into little mounds, well separated, onto the sheet—no more than 6 for a half-sheet pan or standard size cookie sheet, as they will spread. Press them lightly with the palm of your hand; they should be about 3” in diameter. Place them in the oven and cook for 6-8 minutes; you might check them after 5. Timing takes a bit of experimentation. You want to remove them from the oven when they are well browned at the edges and the bubbling white centers look melted but uncooked. Set the pan on the counter and let them cool until the bubbles subside—when you will see that the centers, too, are brown. After they have cooled about 2 minutes, but while they are still warm, gently roll them around a cannoli mold or, if you don’t have one (I don’t) another cylindrical form: I use one end of my tapered French rolling pin. You can do it with them still sitting on the sheet, loosening them if necessary with a spatula; if they are still too warm when you roll them, they will collapse a bit, but if they are just right, they will hold their round shape. Eat any that collapse. With a teaspoon or, preferably, a long-handled iced-tea spoon, fill the cannolis with about a tablespoon of chutney each, working from both sides and carefully pushing it into the tube. Serve. As with the Italian dessert cannolis, these are best filled as close to serving time as possible, all things considered. Of course, you can serve the shells plain, too, as lacey crackers.


Photo of cranberry harvest in NJ by Keith Weller, courtesy U.S. Agricultural Research Service

Sunday, November 11, 2007

A Visual Feast: Farewell to the Growing Season


We knew it couldn’t last. Warm days begat cool nights and finally, inevitably, one morning you walk out to find your thumping-hard pumpkin collapsed on the deck: first frost. So comes the end of late-fall lettuce and tomatoes, tender beans. It’s over. Not that there won't be some brocolli, or a few root vegetables. But the thrill is gone.

I’ve been traveling this past week, and have been nowhere near a kitchen. I’ve eaten quite well, though: fat pancakes, the kind I don’t usually care for, fluffy, tender, and good. A mess o’ pork barbecue with greens, slaw, spicy beans, corn cakes, potato salad; we happened by when the owner was there, and because I was from out of town, I got a free sampler plate of every smoked meat the house made: large pork ribs, pulled pork, short ribs, chicken, kielbasa, and pigs feet. It was dandy. On from Nashville to Louisville, I had, hands down, the best steak I have ever had, with the best classic sides I’ve ever had (including a pristine iceberg wedge with Maytag blue cheese dressing and flavorful little red and yellow tomatoes), at the amazing Jeff Ruby’s. The place bears no physical resemblance to traditional New York houses Peter Luger, Keen's, or the original Smith & Wollensky. It’s glitzy, even shiny. But the steaks, house-aged like Luger’s, are better. They come to table looking charred and black; sitting at the bar, I could see them arriving all around me, wondering if people had ordered them well done, perhaps "burnt." My strip arrived looking the same. Under that blackened crust—an edge, really—was the most perfectly, evenly cooked steak of my long steak-eating experience. It had been placed on a generous amount of absolutely fresh and sweet Worcestershire butter, which had melted across the plate and offered the ideal sauce to every rich and flavorful bite. The meat was so well seasoned it didn’t need a speck of salt. Truly, you could live anywhere as long as they had steak like this, and a good bakery.

And it makes the passing of summer sweet sorrow; we know there are other, soul-warming pleasures ahead. Nevertheless, in tribute to the gifts of summer, here is a final salute, a visual if not veritable feast, of the Rhode Island growing season. Each photo was taken the day of harvest, and each item was eaten at peak flavor, a taste memory that will tide me over through a winter that, carried on the shoulders of a great steak, need not be one of discontent.